browsing label

Showing posts with label Silhouette Cameo. Show all posts

Memories Shadow Box Anniversary Gift

9
My husband and I celebrated our 10 year anniversary at the beginning of this month.  It's hard to believe that 10 years have gone by so quickly!  Since we just had our third baby a couple of months ago, we are going on our anniversary trip next year.  But I still wanted to give my husband something to commemorate the last 10 years together.  A friend of mine shared the idea of using a shadow box to write down memories or moments we've had together.  I found some really cute and simple white shadow boxes at Target with some little wood hearts included that were perfect.  The whole project only took me about an hour total, but the end result was exactly what I hoped for.
9

Easy Blooming Envelope and Card

20
I love how simple these cards and envelopes are to make and they turned out so cute!
One of the many craft supplies I hoard stock up on is scrapbook paper.  I have stacks of it and yet I can never seem to have enough.  I know I can't be the only one with this problem, so I'm trying to be more creative with the ways that I use it.  A goal that I have for myself this year is to send more cards to people: thank you cards, just because cards, thinking of you cards, etc.  But buying that many cards can get expensive, so I've decided that I am going to try and make my cards.  I'll still have some store bought ones on hand but I figure if I have so much cute paper, I might as well use it.  So I used my Silhouette cutting machine and creating a super fun and simple template for some mini cards and envelopes.
20

DIY Laundry Room Sign

20
Paint and vinyl are all it takes to make this cute DIY laundry room sign
The summer after my husband and I got married, we drove out to Buffalo, NY, where he sold security systems.  Towards the end of the summer, his office got moved to Philadelphia, PA.  Thankfully, there were many wives who were out with their husbands so we became good friends and did some sightseeing here and there.  While in Philadelphia, we decided to drive out to a little amish town and do some exploring.  In one of the little shops we visited, I found a laundry room sign.  This sign has been with us for almost 9 years and when I first bought it, I thought it was the cutest thing, but as I've grown into my own personal style of decorating, I found that it just wasn't working anymore.  So I decided to do a little DIY laundry room sign makeover and share this easy tutorial with you!
20

DIY Disney Shirt: Dinglehopper Hair, Don't Care

32
Make this DIY mermaid shirt for your next trip to Disney or for the Disney lover in your life!
One of my favorite parts of going to any Disney park is wearing Disney themed clothing.  It makes me feel like I am part of Disney in some small way and it's just a lot of fun.  When I was planning my trip to Orlando and I found out that a friend of mine and her family were going to be able to come down at the same time as us, the wheels in my brain started spinning.  I knew I wanted to make some kind of a t-shirt for the two of us so we could match.  (Yes, we're those people.)  I started browsing ideas online of cute Disney quotes, made a list and sent it over to her to see what she thought.  We both picked the same two as our favorites and so I got started planning the designs.
32

How To Update Your Garage Door Entrance

19
Easily update your garage door entrance to instantly improve the look!
One of the things I was most excited about when we moved into our home was the attached garage because up until that point, we'd lived in apartments with no covered parking.  Being in Utah, we have some pretty cold days in the winter and scraping snow off my car or cranking the heat in my car for a quick errand was really annoying.  Being in Utah, we also have some crazy hot summer days so then there is the opposite issue of trying to cool down a hot car or being worried someone is going to burn their hands or legs on the buckles.  So having an attached garage was just like icing on the cake of buying our first home.
19

Cabinet Door Makeover

24
Easily transform a cabinet door into a customized sign for your home
A few months ago while I was browsing around a store, I found this awesome serving plate that had all the colors that I wanted to decorate my kitchen in.  The design was fun, the colors were bright and I think it cost me about $6.  Done and done.  Since buying that plate and putting it above my kitchen cabinets, I've slowly started filling in the space.  However, I've run into a few snags because of the way our ceiling slopes above the cabinets so the height varies a lot.
24

How To Use Smooth Heat Transfer Vinyl

8
Creating your own custom t-shirts is made easy with this tutorial on how to use smooth heat transfer vinyl.
Earlier this month I posted a tutorial about how to use flocked heat transfer vinyl and showed you how to make a cute 'mama bear' shirt.  About a week after making the first shirt, I decided to make another one using smooth heat transfer vinyl.  I learned some important differences between the two types of heat transfer vinyl (also referred to as HTV) and I am sharing them with you today along with a tutorial for how to make a t-shirt using the cute pineapple pictured above.
8

How To Use Flocked Heat Transfer Vinyl {Tips from a Beginner}
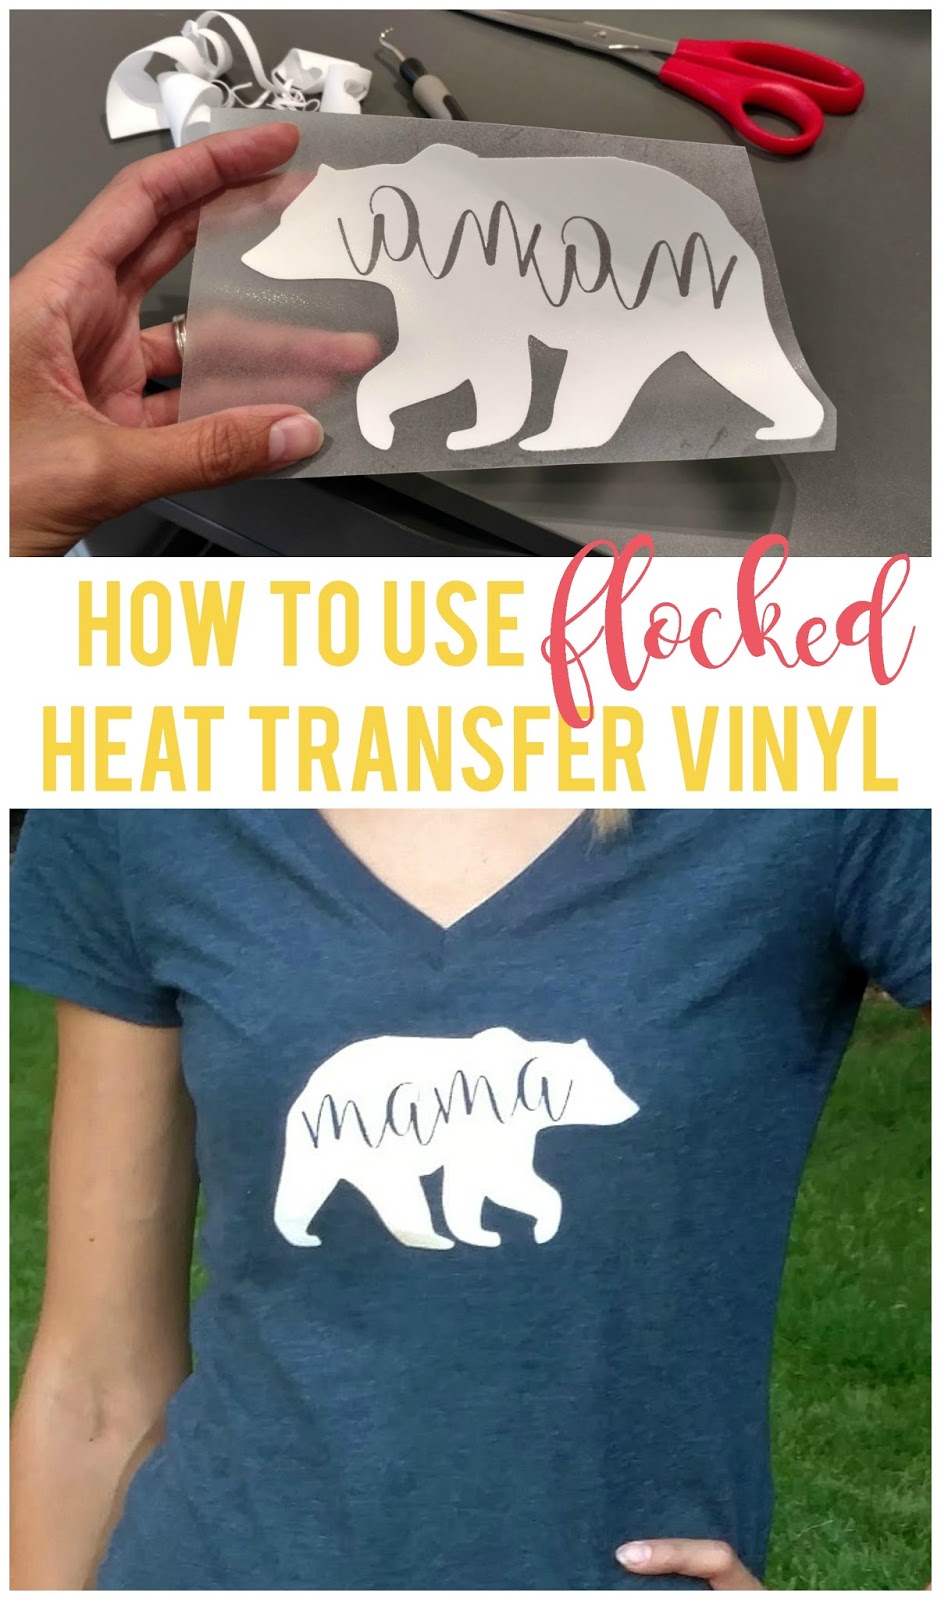
24
Save time and learn tips from a beginner user of flocked heat transfer vinyl.
I was browsing a favorite blog of mine, called A Girl And A Glue Gun, and I saw an entire post about using something called HTV (not to be confused with HGTV, which I also love).  There were pictures of clothes and pillows and aprons and hand towels using this stuff.  I clicked on the post and read a little further where I discovered that HTV stands for heat transfer vinyl which is basically vinyl you can cut out and iron onto anything that is smooth, like t-shirts.
24

Summer Mantle Inspiration

20
Bright colors are my key to decorating for the summertime.
Summer is in full swing here in Utah, complete with 100+ degree days.  So. Hot.  My poor kids, who love being outside, come in by 10am with red cheeks and requests for popsicles to try and beat the heat.  Crazy stuff.

Since summer got here, we've been busy enjoying the nice weather and playing as much as possible.  As a result, my spring decorations never really got put away and my only summer decoration was the cute pallet art I made a couple months ago.
20

Mod Podge Notebook

9
Mod Podge Notebook--A quick, easy and cute way to update a boring composition notebook!
If you are anything like me, you like notebooks.  Big, small, patterned, solid.  I've got them scattered around my house and at least three in my diaper bag.  You never know when you're going to need to make a note or a list.  I'm also one of those people who really likes to write things down and I still have a daily planner.  (My husband buys me a new one every year at Christmas.)

And while deep down I know the purpose of a notebook is just to write things down, another part of me just loves pretty notebooks.  However, I don't like spending an extra couple dollars just to have a pretty print or a cute quote on the front.  Do you feel the same?
9

Summer Pallet Art

6
Summer Pallet Art--a fun and easy way to brighten up your home for the summer!
I was looking at my spring mantle this week and realizing that it was time to start thinking about summer decor.  So I looked through my summer decorations and noticed a serious lack of summer-y-ness (totally a word) in my collection.  A few months ago I picked up a 12x12 unfinished pallet board at Walmart without knowing exactly what I wanted to do with it but thought it would come in handy one day.  (This is a habit that drives my husband crazy, but sometimes I just can't help myself.  *wink*)
6

Disney Countdown Chain

8
Disney Countdown Chain--a simple and cute way to countdown to your Disney vacation.  (Free print files included!)
Last October, we took our first family vacation to Disneyland!  It was so much fun and the kids loved it.  I hadn't been to Disneyland in about 15 years so I was excited to go too!

Since this was a somewhat last minute trip, I didn't have as much time to build my kids (mostly my daughter) up to it as much as I would have liked.  Like most kids her age--she was 3 at the time--she doesn't fully understand the passage of time.  To help her with this (and to save my sanity!), I made a simple Disney countdown chain.  We've used countdown chains before to help her learn how time passes (see this post here), so I knew that making one again would be a successful way to count down to our trip.
8

Women at the Well (Relief Society Birthday Dinner Activity)

2
Women at the Well (Relief Society Birthday Dinner Activity)
Each year, we have a Relief Society activity geared to celebrate the founding of the Relief Society.  (For those of you who might not know, the Relief Society is a women's organization within my church that serves the ladies within our local vicinity.)  As I was thinking about themes for the night, the story of the woman at the well came to my mind (John 4:5-14) and I felt that the message could be applied to us.  I presented the idea to my committee and they all agreed that it was a good theme and message to share with the sisters in our ward. We recently held our activity and everything turned out so well that I wanted to share it with others who might be looking for a theme for their own ward's Relief Society birthday dinner.
2

How to Make a Chore Chart for Preschoolers

0
I've been thinking for a while now that I wanted to give my daughter some daily chores.  She's turning 4 next week and it's the beginning of a new year so it seemed like a great time to get a program going for her.

I started out by making a list of chores.  The easiest way to do this was to search for 'age appropriate chores' on Pinterest.  There are tons of charts that break it down by age that I found so it didn't take long to make a list of my own.
0

How to Make a Holiday Glass Block

0
How to Make a Holiday Glass Block--an easy decoration to make for yourself or as a gift for holidays, birthdays, weddings, etc
Over the last few years, I've been working on discovering my own personal home decorating style and slowly but surely things are coming together.  This has, of course, extended into my holiday decor.  Each year, I've been getting rid of decorations that I no longer like or use and buying or making some that contribute to the overall cohesiveness of the look I'm going for.

A while back I was browsing through a local boutique that was closing their business.  They had a back room with tons of random items I wouldn't have expected to find there considering it was a clothing and jewelry boutique.  Out of everything in the store, I didn't buy jewelry or clothing--I bought glass blocks.  They only had three of them but I took them all and at a killer price.  I had the best of intentions to make something cute out of them for my home but never got around to it.  (This happens fairly regularly and it drives my husband crazy.  But I do get around to it eventually. *wink*)
0

Book of Thanks Tutorial

0
Book of Thanks--quick and simple tutorial on how to make a Book of Thanks for commemorating Thanksgiving each year!
Last week I posted about new traditions I'm going to be starting this Thanksgiving.  One of the traditions is a Book of Thanks, which is basically a journal or binder that you can bring with you each Thanksgiving, wherever you are, and have everyone write what they are thankful for (or draw a picture) in it.  (You can read more about it here in the original post.)  Today I am sharing a tutorial on how I created my Book of Thanks.  Hopefully it will give you some ideas about creating your own.
0