This post contains affiliate links which means if you click on a link and make a purchase, I will receive a small commission at no additional cost to you. Thank you for your support!
As always, I used my Silhouette Cameo for cutting. It is amazing and I never hesitate to recommend it to anyone. The first design was going to be centered around the words: dinglehopper hair, don't care with a fork in the middle. (I'll be sharing the tutorial for the other shirt next week.) We both love The Little Mermaid so it just seemed natural that we'd do a shirt based on that. I bought our t-shirts at Target because I love their basic v-necks. (They are the same ones I used for my mama bear shirt and my pineapple shirt.) When I got them home, I measured the smaller of the shirts and then used those dimension to decide how big the design should be. (I used the same size design for both shirts.)
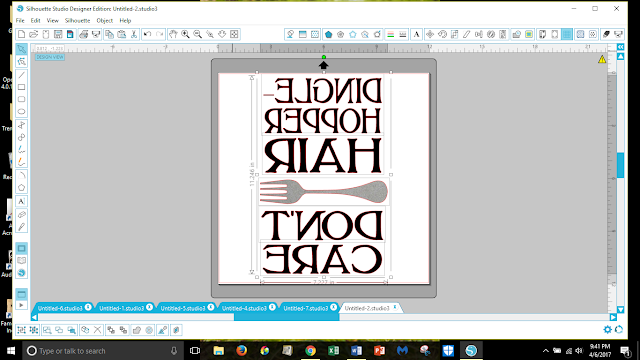
I used my Silhouette Studio to create the design exactly how I wanted it. I used the same font for all the words, but the sizing is different. I squished some of the words and stretched others to make it all fit within the space I'd decided on. I found a fork silhouette on Google, saved it to my computer and used the trace feature to outline the shape. I manipulated the shape of the fork to extend just barely past the words.
*Note: I used the font Bolton, which is a free font. You can download it HERE. If you need help downloading and installing a font onto your computer, click HERE for a tutorial.)
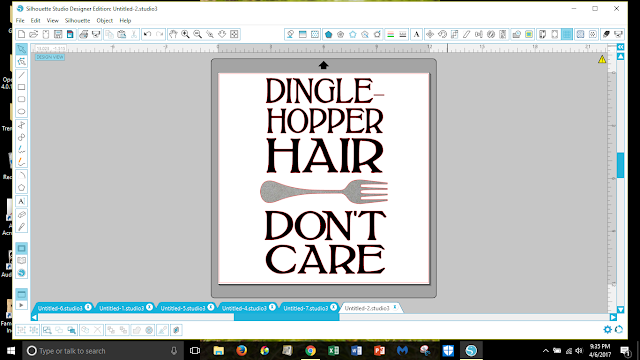
Once I had everything where I wanted it, I colored the words and fork in with the colors of HTV (heat transfer vinyl) I wanted to use so I could see how it would look. You can see my design below was pretty simple.
I had chosen a purple t-shirt and thought that black lettering and a silver glitter fork would look cute. I ordered my HTV from Expressions Vinyl because they have great pricing, especially on their specialty vinyl like the glitter, glow-in-the-dark, etc.
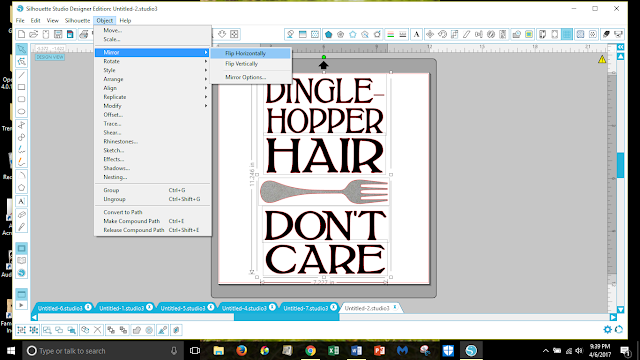
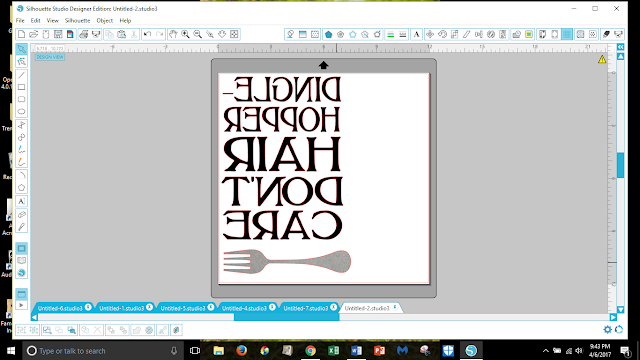
When I got the vinyl, I went back into my Silhouette Studio to my design. Select your entire design and flip the image. This is an important step because when you cut the vinyl, you are cutting on the BACK, hence the reason why you'd want to make sure your image is flipped. Otherwise, you'll end up with backwards text. You can flip your image by selecting all the pieces that need to be flipped, then clicking 'Object' >> 'Mirror' >> 'Flip Horizontal'.
After everything had been flipped, I moved the fork out of the design and moved the text up so that it was all together and put the fork at the bottom. Doing it this way allows you to cut all of the text at the same time out of the same color. Then you can cut a piece of HTV for the fork and put it underneath the black HTV on your cutting mat.
*Tip: Turn on your ruler so you can see how to line up your design and use the least amount of HTV possible. It will also help you know where to put the glitter HTV so it cuts out the fork in the right place.
Cut out your HTV to the appropriate size from your sheet or roll and place it, shiny side down, on the cutting mat and load it into your machine. Make sure to double check the cut settings, as they are different for smooth versus glitter HTV. When I did it, I opened the cut menu and selected the fork and marked it as 'no cut'. Then I changed the cut settings to smooth HTV and let it cut out the letters. When it finished cutting the letters, I left it in the machine (meaning I did not unload it). Then went back to the cut menu, selected the fork and changed it to 'cut' and selected the text and changed it to 'no cut'. I updated the cut settings for glitter HTV and then sent it to cut.
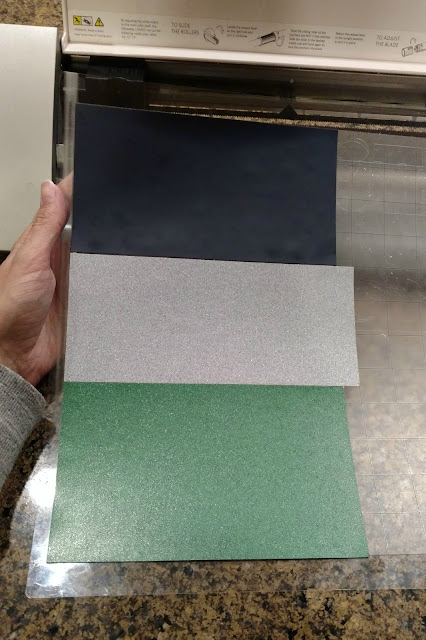 |
| An example of how I place different colors on the same cutting mat |
*Tip: If you are making more than one shirt with the same design, you can create a new project page that has all the text on it and another that has all the forks on it. Then cut all the words out of one piece of smooth HTV and all the forks out of glitter HTV. This way you don't have to worry about the 'cut' and 'no cut' settings, only the cut settings for each type of HTV.
After everything had been cut out, I pulled the vinyl off the cutting mat and weeded it all out. (Weeding is when you remove everything that isn't a part of the design.) I love having this weeding tool because it makes getting tiny pieces of vinyl out so much easier.
Once my design had been weeded, I cut the words apart between 'hair' and 'don't' so that I could place the fork in the middle. (I've noticed that the HTV from Expressions Vinyl is actually a little bit sticky so you can put it on your shirt (or whatever you're making) and it will stay in place. This is nice because when it comes time to iron the HTV on, you know it's not going to shift if it gets bumped.)
I centered the words below the point on the v-neck shiny side up and adjusted them until they looked right. Then I turned on my iron to the hottest setting. While it was heating up, I grabbed my ironing board and piece of cotton fabric to lay over the design while I was ironing. You do not want to place a hot iron directly onto the backing of the HTV. It will melt and ruin your iron. When the iron was hot, I centered the shirt long ways on the ironing board so the entire design fit on the board. Then I laid the cotton fabric, doubled up, on top of the design. (You can use any color fabric you have, but I chose white so I could see through it a little easier and know that I was on top of the design.)
To iron the HTV to the shirt, I placed the iron on top of the shirt (again, with the cotton in between the shirt and the iron) and press firmly for about 45-60 seconds. I used the stopwatch setting on my phone and just moved the iron each time it hit the 45 second increment.
*Tip: Glitter HTV will require a little more time under the iron because it is a little bit thicker.
Once you feel like you've gotten everywhere, remove the cotton fabric barrier. Gently pull on the plastic backing to see how easily the vinyl comes away from it. There will be a little bit of resistance, but the edges of your design should stay on the surface you've ironed it to if you've done it correctly. If not, just replace the cotton and press the iron in the spot(s) that need a little more heat.
Let the shirt cool after you've removed the plastic backing from your vinyl and then try it on!
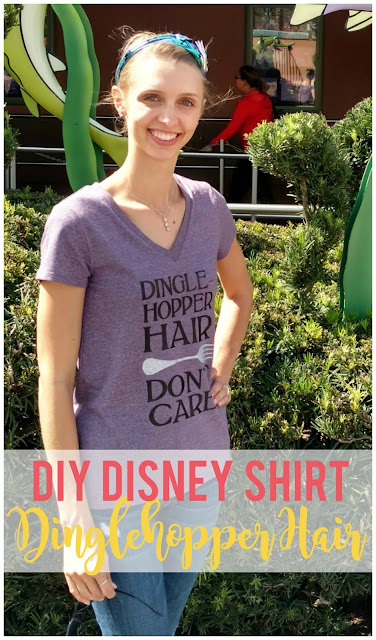
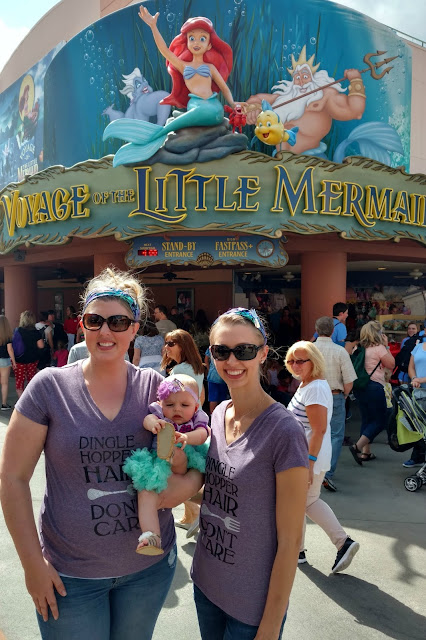
I am SO happy with the way this shirt came out! It is exactly like I pictured in my head and it was so fun to wear it to Hollywood Studios with my friend. Twinning at its best. *wink*
What would you put on your Disney shirt?




I wish I could make my own shirts like that - great job!
ReplyDeleteThanks Dara! It was a lot of fun!
DeleteWhat a cute t-shirt! I have never made a t-shirt before but think I could with these instructions. And it has a Disney theme, so even better!
ReplyDeleteI'm so glad my instructions give you confidence to try it out on your own! Let me know if you need any help. :)
DeleteThis shirt is so cute! I love my Silhouette but I don't use it as often as I should!
ReplyDeleteThank you! I feel like I use my Silhouette for everything, haha!
DeleteI need that shirt! I have some crazy buns going on 2-3 days a week!
ReplyDeleteI hear you! And when I wear this shirt, I don't feel as bad about it. ;)
DeleteThis is really such a great idea!! We can make any simple t shirt interesting! Thanks for sharing! :)
ReplyDeleteThis is so cute!!! I'm always looking for new projects for my cameo!!
ReplyDeleteThanks Lindsey! Glad I could help! ;)
DeleteThis shirt is SO cute Shani! Seriously, I love the saying and the layout you picked. And I like your tips about putting the different colors on the same mat at once, that sounds like a great idea. I can't believe I haven't done that!
ReplyDeleteThank you Justine! And yeah, I think I saw that tip on another tutorial somewhere, but it's a great time saver!
DeleteOh my goodness! I need one of these shirts!!
ReplyDeleteIsn't it so cute? I think I'm going to make one for my daughter.
DeleteWhat a cute shirt! Makes want a Silhouette even more. ;)
ReplyDeleteThey are so fun! I use mine for so many projects!
DeleteOMG. This is absolutely THE CUTEST THING EVER!
ReplyDeleteI've been DYING for a Silhouette!
Thank you so much Rachel!
DeleteGah! I didn't know you made that shirt!! I really love it so much! Your mama bear shirt inspired me to make my own shirt (which I have yet to do) and this reminded me to get on that! ;)
ReplyDeleteThanks Danielle! This shirt makes me so happy. :) And the mama bear shirt was my first ever HTV project and I still wear that shirt too!
DeleteSo cute! Love it.
ReplyDeleteThank you Lisa!
DeleteI think it's so cool that you made your own shirts! So creative!
ReplyDeleteAwe, thank you Emily!
DeleteSuch a cute shirt! I really need a Silhouette!
ReplyDeleteThanks Sarah! I'd love to see what you could make with a Silhouette. You are so creative.
DeleteI have a cricut, and I'm sure I could do the same type of thing, but I've never tried. Maybe I'll have to do it for our Disney trip this year -- inspired by you!! :)
ReplyDeleteI'm sure you could Lora! Although I'm afraid I wouldn't be able to help you since I'm not familiar with Cricut. But I'd love to see what you come up with!
DeleteWhat a cute idea for a Disney shirt! Tweeted!
ReplyDeleteThanks for commenting and sharing Nicole!
Deletesuch a cute shirt! love this idea
ReplyDelete