I remember talking to a friend one day after having my second baby (and receiving more burp cloths from the same lady) and she commented on how it was so smart to use cloth diapers as burp cloths. I was like, "What? I've been wearing a diaper on my shoulder?" (Obviously, I was not familiar with cloth diapers.) She kindly enlightened me and from that point on I've been wanting to try my hand at making some cute burp cloths. I mean, if you're going to be wearing one around for the first few month of your child's life, they should be stylish, right? *wink*
I found a tutorial on The Thinking Closet that I liked, however, I did modify it slightly. This is a very simple tutorial and one that even a beginner can do since it only involves straight lines.
Let's get started!
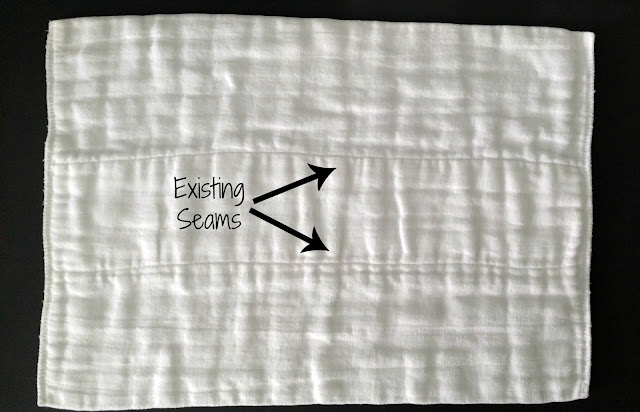
Step 1: Gather your materials. I found a 5 pack of pre-folded 6-ply cloth diapers at Target for $12.99. They were the only place around that carried them in-store and I was impatient to start sewing. (In the future, I will be ordering these cloth diapers.) I bought 1/3 yard of 3 coordinating fabrics from JoAnn's for just over $5 which is cheaper than buying the pre-cut fat quarters at $2.50/each. (Plus I can accent at least 4 burp cloths from each piece, instead of the 3 I'd get from a fat quarter.) If you have some scrap fabric laying around, you could use that or you could purchase some fat quarters.
Step 2: Pre-wash your fabric and iron. I don't normally pre-wash my fabric but since I wasn't sure if there would be a difference in shrinkage between the cloth diapers and the patterned fabric, I decided to this time around to be safe. Just wash in cold water and dry as you would your clothes. Adjust the settings on your iron for the type of material you are using (mine was cotton).
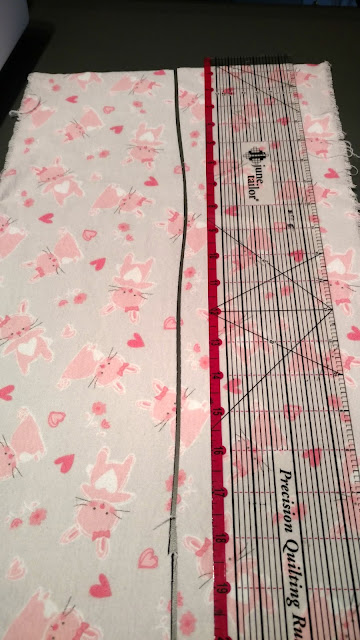
Step 3: Measure and cut. The cloth diapers I used measured about 18x12 after washing them. My final measurement for the patterned material was about 5 1/2" x 22" but that was approximate due to the different shrinkage I saw in each fabric that I bought after washing. The most important thing is to have a piece that is long enough to fold under around all sides so you end up with a clean edge.
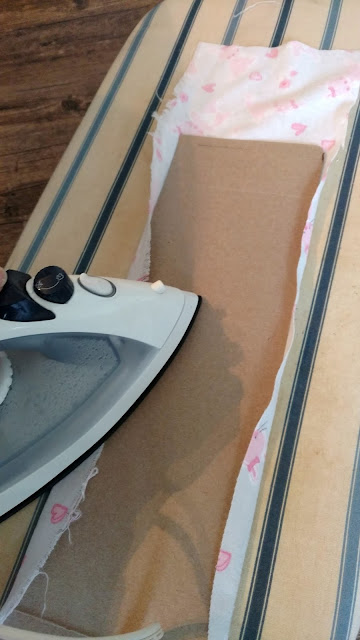
Step 4: Press your seams. Pressing your seams makes the fabric lay nice and flat so you don't have to fight with it when you are sewing the pieces together. It's not absolutely necessary but it definitely helps. A neat tip shared on The Thinking Closet tutorial (who got it from Diary of a Quilter) is to use a piece of cardboard that has been cut down to the desired dimensions, then simply fold over the excess on each side and iron it. (You can see that I used a cereal box.) I cut my cereal box down to 4 3/4" wide and about 17" long.
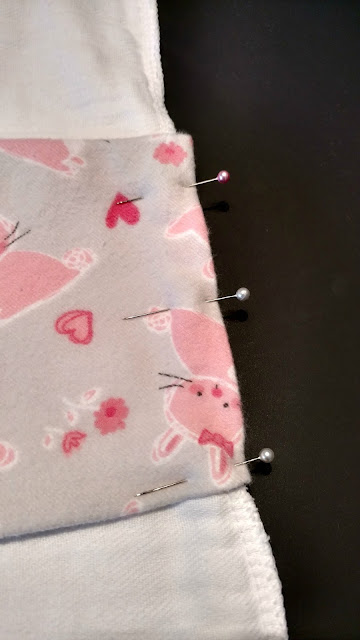
Step 5: Pin your fabric to the cloth diaper. Line up your patterned fabric on top of the middle section of the cloth diaper. Use pins to keep it in place. You shouldn't have to go too crazy with the pins if you pressed your seams, maybe 3 or 4 total, since the purpose it to just keep it from moving around while you get it situated on your sewing machine. Remember to fold the top edge under so you have a nice, clean edge.
*Note: Since cloth diapers vary a little bit in how straight the lines down the middle are, so just center your patterned fabric as best you can.
Step 6: Stitch across the top and bottom. Before you start sewing, move your needle position all the way to the left. Line up the right side of the patterned fabric to the faint center-line on your presser foot. (see picture) You want your stitching to be as close to the edge as possible. Since you cut your patterned fabric longer than actually needed, you will need to trim it at the bottom and fold it over just like you did with the top. Remember to backstitch at the beginning and end.
Step 7: Stitch across the left and right sides. Follow the same directions as step 6, remembering to leave the needle in the left position and backstitch at the beginning and end. You should now have all four sides stitched.
*Note: If you make a mistake (like I did on the first one I sewed) and sew the top and sides first and are left with the bottom side, just cut down the fabric and fold it under and tuck it inside and sew across like you would have done in step 6.
Step 8: Admire your darling new burp cloth!
And there you have it! A super simple, super cute burp cloth. The first one took me longer than the rest, but once you get into a rhythm, you'll be whipping these out like nobody's business. I love that these are handmade and can be completely personalized for whoever you are giving them to. The possibilities are as endless as the patterns available!
What are your favorite handmade baby gifts to give/receive?
This post contains affiliate links which, if clicked on and the item is purchased, I will receive a small commission at no additional cost to you.


Great tutorial - I love ones that make me think I just might be able to do it! My favorite gift is anything monogrammed or personalized!
ReplyDeleteThank you Kim! I've run across tutorials before that aren't very complete and it can be frustrating, so I appreciate that you feel mine was useful. Personalized gifts are the best!
DeleteThis is a really cute idea! Love it.
ReplyDeleteThanks Shannan! :)
DeleteThis is PERFECT! I have a whole bag of cloth diapers and a baby due in a month. I actually had 'sew burp clothes' on my to-do list today, and I was going to go to Pinterest to find a tutorial...but instead I found yours! Perfect!
ReplyDeleteOh, that's awesome! I'm so glad I could help. ;) Good luck getting everything ready before you baby comes!
DeleteOh these are so cute! We have some many of those white cloths around. I wish I would have made these!
ReplyDeleteThanks Angela! They are pretty neat. :)
DeleteSo cute and so easy! I'm really hoping to learn how to use our sewing machine so I can make some fun goodies!
ReplyDeleteI'm not a pro at sewing, but I love making things! It makes me feel so domestic! ;)
DeleteOh my gosh these are so sweet!! Neither of my kids EVER spit up, like really never. So I didn't end up using burp cloths at all. They would make the sweetest gift :)
ReplyDeleteOh, wow, that is so lucky Sarah! My kids definitely did, but having these burp cloths were life savers.
DeleteAw, these look so cute and I love how you make this sound so easy! I am so terrible at sewing but your instruction make me want to get out the machine and start working on burp cloths. They would make such a cute baby shower gift!!
ReplyDeleteBust out your machine Sabrina and give it a shot! These burp cloths are a great beginner project and make great gifts. :)
DeleteMy mom made me these for my first and they are GREAT burp clothes -- plus so cute, too!
ReplyDeleteAgree Lora. If you've got to wear a burp cloth, you might as well make it cute. ;)
Delete